“], “filter”: { “nextExceptions”: “img, blockquote, div”, “nextContainsExceptions”: “img, blockquote, a.btn, a.o-button”} }”>
You know the feeling: It’s 3 p.m. and you can barely keep your eyes open. Maybe you didn’t sleep well the night before because you were feeling too wound up to fall asleep or your worries kept waking you in the wee hours. Whatever the cause, lack of sleep at night means you’re exhausted during the day.
Almost 60 percent of people who practice yoga say it helps improve their sleep quality, according to a National Health Statistics Report. Research has indicated numerous times that yoga is associated with reduced levels of stress and anxiety and improved slumber.
Yoga for Sleep: 6 Poses for Winding Down
These simple yoga poses can help you “switch off” before you try to sleep for the night or even as you prepare for an afternoon nap.
1. Easy Pose (Sukhasana)
Sit on a bolster or cushion with your legs crossed. Let your shoulders relax. Place your hands on your thighs or in your lap. Focus on your breath as you slowly inhale through your nose and count to 4 and then exhale through your nose for 6 counts. Focus your attention on your inhalations and exhalations.
2. Seated Side Stretch
From Easy Pose, place your left hand on the floor beside your left hip with your elbow slightly bent. Reach your right arm overhead and toward the left as you lean to the left side. Draw your shoulders away from your ears. Once again, slowly inhale as you count to 4 and exhale as you count to 6. Switch sides.
3. Seated Forward Bend (Paschimottanasana)
Sit with your feet and legs straight in front of you. Inhale and stretch your arms overhead. Pause here for a breath or two and then exhale as you slowly bend forward from your hips. You can rest your hands on your thighs, shins, or feet or you can wrap a belt or strap around your feet and hold onto either end of it. Relax your shoulders and unclench your jaw. Breathe here.
4. Restorative Twist
Lay a bolster lengthwise on your mat. (You can instead stack a couple of pillows or blankets folded into rectangles.) Position your right hip at the base of the bolster, twist to the right, and slow lower your chest onto the support. Turn your head to face the same direction as your knees and rest your right cheek on the bolster. Bend your elbows and rest your forearms on either side of you. Let your breath lengthen as you allow your body to sink into the support. Notice if your forearms and hands are pressing into the floor or if you’re tensing your thighs and try to release. Pause here for 3 to 5 minutes. Slowly come back to sitting, shift onto your other hip, and repeat on the opposite side.

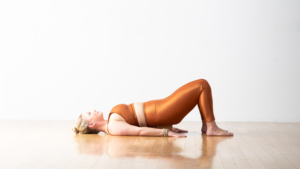
5. Supported Bridge Pose (Setu Bandha Sarvangasana)
Lie on your back with your knees bent and your feet flat on the floor, hip-width apart. Bring your heels as close to your sitting bones as you can. Rest your arms at your sides, palms facing down, fingers reaching toward your heels. Press into the soles of your feet to lift your hips off the mat. Slide a bolster or block on the lowest setting underneath your sacrum. Lower yourself onto the support. Turn your palms face up, if desired. You may find it easier to relax your legs by letting your knees rest against each other. Rest in this position for 3 to 5 minutes.

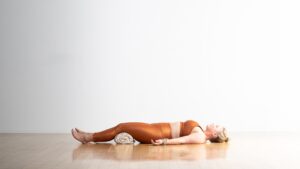
6. Corpse Pose (Savasana)
Come onto your back and use whatever props you need for support and comfort in Savasana, such as a rolled-up blanket underneath your knees. (You may opt to do this final pose in bed right before you go to sleep.) Start by noticing your breath as you start to slow your breath. Starting with your feet, tense your toes and then relax. As you inhale and exhale, slowly continue to scan the length of your body—from your calves to your thighs, hips, torso, neck, arms, and fingers—flexing your various muscles for 10 seconds and then relaxing them. Include your jaw, cheeks, forehead, and top of your head. Then release. Linger here as long as you can or until you fall asleep.
This article has been updated. Originally published May 10, 2021.

