“], “filter”: { “nextExceptions”: “img, blockquote, div”, “nextContainsExceptions”: “img, blockquote, a.btn, a.o-button”} }”>
Ever take a yoga class and the teacher fires off a ton of cues while you’re holding an insufferably difficult pose for what seems like 50 minutes and you can’t learn anything because you’re simply trying to survive?
Imagine instead what it would be like to learn the same basic shape but from the comfort of your back.
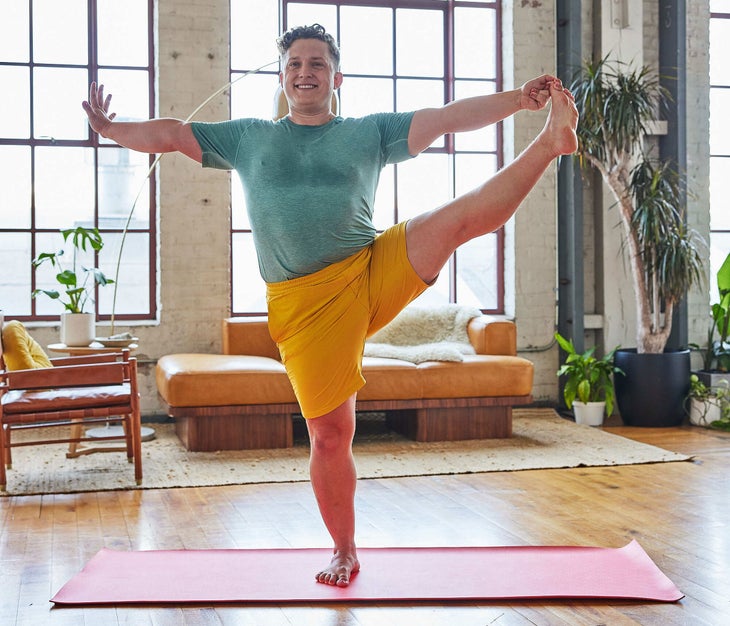
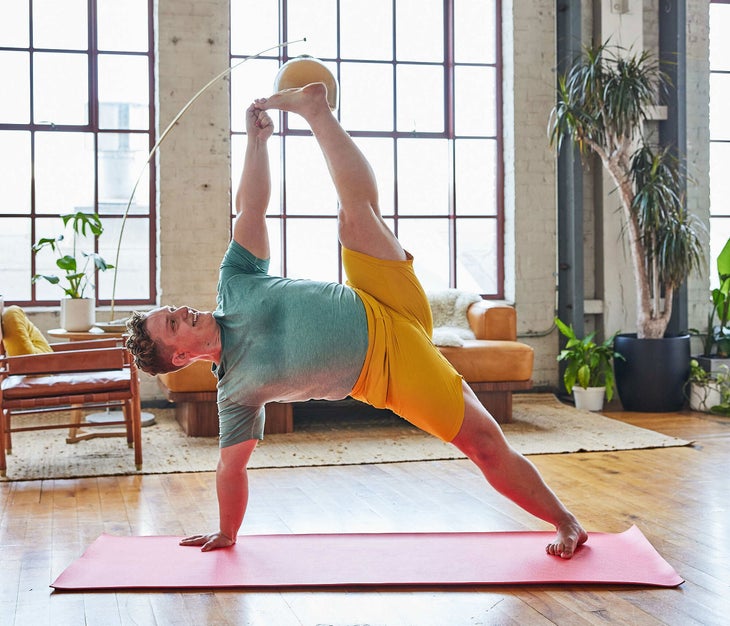
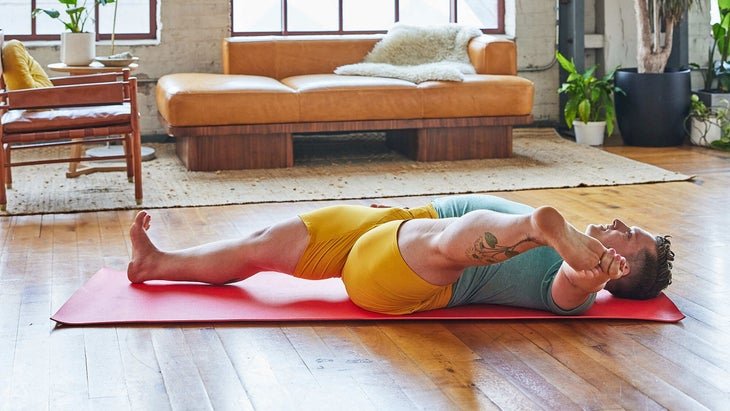
Think of the poses Supta Padangusthasana II (Reclining Hand-to-Big-Toe Pose II), Utthita Hasta Padangusthasana II (Extended Hand-to-Big-Toe Pose II), and Vasisthasana (Side Plank Pose). In each pose, you’re holding onto your big toe and bringing that leg to the side while keeping the rest of your body in Tadasana (Mountain Pose). They’re essentially the same pose but with a different relationship to gravity.
The exact same shape that can feel almost easy in one pose can, let’s just say, be challenging as hell in another physical plane. I don’t know about you, but I would take chilling on my back over Side Plank any day. Kindly note, I’m only divulging my inherent preference to be lazy because I’m trying to make an important point: Different yoga poses often repeat the same basic shapes and actions in the body, just in a different physical plane. Your capacity to see the patterns that repeat across yoga poses over and over again can help you be more comfortable and safe as you learn more challenging postures that are not as unfamiliar as you might have thought.
Same shape, different demands
Side Plank II, Standing Hand to Big Toe Pose, and Reclining Hand to Big Toe Pose each have varying degrees to which strength, flexibility, and balance come into play. The amount of flexibility required by each pose is quite similar, yet the degree of strength and balance demanded by the poses is quite different.
Usually, as the demands of a pose increase, our capacity to work with detail and refine alignment decreases, at least during the beginning of our experience with that posture. It’s understandable. We’re still trying to wrap our heads around what is actually going on. Which means when we try to learn new shapes and techniques, it’s best to do it in a physical plane that demands less intensity. Instead of gasping for air while you attempt a difficult pose for the first time ever, give it a go and build a rapport with actions and alignment in the same relative shape, but in a plane that requires less strength and balancing.
Picture this: You are a beginner yoga student and you are in my class and we are working on externally rotating the thigh bone. As the cunning yoga teacher that I am, I know that there are lots of poses in which I can teach you to externally rotate your thigh. Would it be smart for me to choose Side Plank II as the pose to introduce you to the concept of external rotation? Well, unless I am trying to make you suffer, no. The degree of strength required to hold Side Plank would demand most of your attention, leaving little room and time for you to ruminate on external rotation of your leg.
Now imagine that I introduce you to external rotation on your back in Reclining Hand-to-Big-Toe Pose II. Later in class, I bring you into Standing Hand to Big Toe Pose (standing on one foot increases the ante a little) and you re-encounter the same alignment that you explored on your back in the reclining variation. After practicing external rotation in both Reclined and Standing Hand-to-Big-Toe Pose, when it comes time to externally rotate the thigh in Side Plank II, you should be more familiar with the technique.
We can use the less intense versions of the pose like a step ladder to eventually arrive at Side Plank. Imagine you are dating Side Plank. Instead of meeting its friends on the first date, why not take it on a few l0w-key dates first? Maybe you two could go to the movies and hold hands. Then on the second date, you could take it to a candlelit dinner and have a meaningful conversation. Perhaps then, once your rapport is more established, it would be time to test your relationship by hanging out with its friends.
Same shape, different pose
For teachers and students alike, recognizing these patterns of repeated shapes is a tool you can use. Knowing this allows you to warm up the body for “advanced poses” by starting with the least demanding version of the shape and leading up to the others. Not only that, it’s a way to actually embody and start to understand how to hold yourself and engage your muscles in the “advanced pose” before you even attempt it.
In the following practice we will explore the same basic shape, in different, progressively demanding poses. Although it is not necessary to do the sequence below to engage with the content of this article, it will certainly be helpful in the process of deepening your understanding of just one of the many shapes that is repeated over and over again in different poses. In fact, in the process of learning about yoga, there is no better way to do it than just hopping on the mat and taking yourself on a test drive. (or I could say, “there is no better way to learn about yoga than doing yoga.” hah either one)
Supta Padangusthasana II (Reclining Hand-to-Big-Toe Pose II)
Begin by coming into a reclined position. Raise your left leg and bring it toward your chest. Wrap the first two fingers of your left hand around your big toe and reach your heel towards the sky. (You’re welcome to keep your knee bent or wrap a strap around your foot if holding onto your big toe is a no-go at this point. Always meet your body where it is at and honor your limits, especially while we warm things up!)
Rest your right hand on your right hip as a reminder to firmly root the left hip towards the floor. Flex and awaken your right foot.
Slowly lower your left leg to the side as far as is comfortable, without letting your right hip lift. (If the right hip lifts, raise your left leg a little and reconnect your left hip to the floor.) Externally rotate your left leg so your toes turn a few more degrees towards the floor and the heel turns a few degrees towards the sky. The degree of this rotation will be somewhat minimal, but it will help you level your hips. This is important because the right hip has a tendency to lift too much in relation to the left hip on this side.
Broaden your shoulders and reach your left arm out into a T position on the floor. Begin to visualize your body in this same shape, just in Side Plank!
Take 5-10 deep breaths and then repeat this pose on the other side.

Utthita Hasta Pandangusthasana II (Extended Hand-to-Big-Toe II Pose)
From Mountain Pose, lift your left knee up towards your chest as you firmly root through your right foot. Take your right hand to your right hip. Capture your left big toe with your pointer finger and middle finger. Before you straighten your left leg, open your left knee out to the side with your left arm inside your leg. Slowly straighten your leg, pushing through your heel. Reach your right arm to the right so your arms are in a T position.
There’s a tendency to stick the butt out here, so just like you did on your back, externally rotate your left thigh bone. It might only be a few degrees of rotation, but it will help you level your hips.
Stay focused with your eyes on one point straight in front of you, drive your standing right heel into the floor, and extend the crown of your head up to the sky. After 5 breaths, bend your knee and plant your foot back to the ground. Congratulations! You survived this standing balance pose, hopefully without knocking over any fine china. Repeat on the second side.

Vasisthasana II (Side Plank II)
Let’s give Side Plank II a try! You’ve basically already done the pose. I could easily offer a photoshop tutorial on how to combine a picture of you in side plank and hand to big toe pose B, resulting in a glorious Instagram pic of you in the pose on the side of a majestic mountain top…but I have no idea how to use photoshop, so I will just teach you how to combine these poses in real life. Just remember, a pose like side plank B, with many dynamic elements and actions, can seem overwhelming and unattainable at first, but you just have to break it down!
Start in Downward-Facing Dog Pose. Shift forward until you’re about halfway to Plank. Then, roll onto the pinky toe side of your right foot. Keep the hips fairly lifted, so you can firmly press almost the entire bottom of your right foot to the floor. The more contact the bottom of your foot has with the floor, the more stable your pose will be.
Now, like you did in standing Hand to Big Toe II, draw your left knee up towards your torso and capture the left big toe with your first two fingers. Before you stretch your left leg towards the sky, straighten your bottom right leg completely and send your hips forward and up. Press through your right hand as you slowly reach your left heel toward the sky. Externally rotate your left hip bone.
You’re basically in the pose at this point. So perhaps quit now…or stick around for a moment, and refine your Side Plank II with some further technical nuance.
As you extend your left heel up and lift your hips like you mean it, draw back through the base of the skull and extend your spine into a little backbend. Trust me. Drive down through the finger pads and knuckles of your right hand and turn your inner arm forward towards the front of the mat. Broaden your shoulders and maybe even turn the gaze up to the sky.
Stay for 5 breaths. Lower your hand and foot to the mat and come back to Down Dog. Repeat on the other side.
Now, if you’re just sitting on the floor staring at this page feeling defeated because Side Plank II seemed like a flop for you, just remember, we all feel defeated sometimes. As much as you should enjoy being curious and excited to adventure into a bigger pose like side plank B, just remember that your ability to accomplish the pose perfectly, or even at all, has nothing to do with how advanced you are as a yoga practitioner. Here is my advice. Keep working on building out the elements of the shape in the earlier, less demanding poses in the sequence. Eventually, you’ll either be ready to attempt Side Plank II again, or you’ll be fully satisfied by doing the same shape from the comfort of your back. The poses, big or small, are just tools in the greater practice of embodiment and presence.
About our contributor
Jack Workman ERYT-500 discovered his love for yoga at a young age and has been teaching since 2010. His teaching approach is rooted in alignment, accessibility, and having fun. In Jack’s class you can expect to feel the physical benefits of the practice and learn something new about your mind and body each time. Jack uses humor and playfulness to communicate yoga’s most important teachings in an approachable way. He lives in San Francisco, and is a full time yoga teacher. You can practice with Jack online via YouTube and in person at various San Francisco studios. See jackworkmanyoga.com for his full schedule./em>

