
“], “filter”: { “nextExceptions”: “img, blockquote, div”, “nextContainsExceptions”: “img, blockquote, a.btn, a.o-button”} }”>
You’ve probably heard the expression “less is more.” This applies to many things in life, including yoga. For example, sometimes in our rush to be able to come into a pose, we force our bodies into a shape it’s not prepared to take. This can become especially exhausting in backbends, which feel amazing in the moment and counteract the constant tension caused by hunching over our devises and our keyboards all day. Although despite their benefits, backbends require a substantial amount of effort, and chances are you’re already exhausted from (gestures at everything). Plus, they create a considerable amount of internal heat. When you couple that with the sweltering temperatures this summer, you can easily overheat and overtax your body.
So, how can you continue to experience the physical and emotional benefits of backbends without creating undo strain and excess heat in your body? There are a couple solutions. First, avoid the most intense heat-trapping postures—mainly prone or “belly down” positions that put pressure on the belly and solar plexus such as Dhanurasana (Bow Pose) and Salabhasana (Locust Pose). According to the ancient science of Ayurveda, these activate your pitta fire and lock in heat.
Second, you can reach for blocks when you practice backbends. Relying on blocks provides support in an array of ways that downshift the intensity and strength required to come into the shape of a pose, thereby reducing the amount of internal heat. And, as always, blocks also provide feedback for your muscles as you learn proper alignment and can help you learn how to build strength, flexibility, and ease in challenging postures.
Here are several block-friendly variations of common backbends.
See also: Unlock Your Backbends With Yoga Blocks
4 backbends you can safely practice with blocks throughout summer
Pose benefits:
- Strengthens the back muscles
- Stretches the throat, chest, abdomen, and psoas
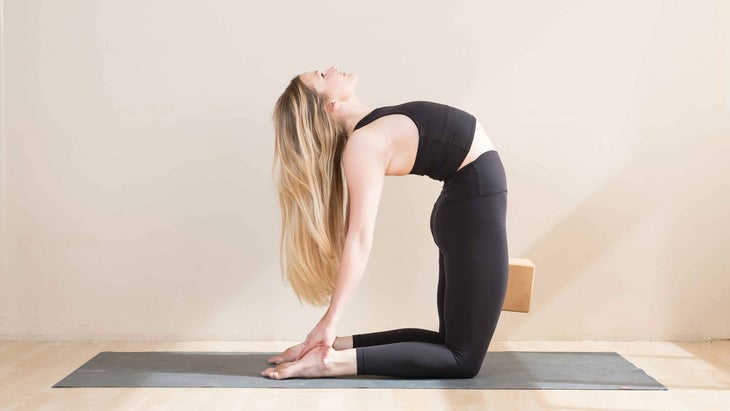
Option 1: Camel Pose with blocks beneath your hands
You may already be familiar with the option to tuck your toes and lift your heels in Camel, which decreases the degree to which you need to backbend. Using blocks alongside your ankles brings the support closer to you, minimizing the intensity while still enabling you to take the backbend shape, all the while giving your support.
How to: Bring your knees hip-distance apart with your shins parallel to one another. Stand on your knees with your thighs perpendicular to the mat. Place blocks on their tallest level on the outsides of the ankles. Rest your palms on your sacrum, where the buttocks and low back meet. Your palms can face you or away from you. Use your hands to press your tailbone down toward the backs of your knees as you lift your sternum toward the ceiling. Slowly lift your gaze back and draw your shoulder blades toward the back of your ribs.
Slowly bring one hand at a time to the blocks, keeping your thighs perpendicular to the mat. Try to reach your hips toward the wall in front of you. If you notice your buttocks tighten and clench, soften them a little by trying to roll your inner thighs inward toward one another. If it’s comfortable for you, you can lower your head back. If it becomes difficult to breathe or you feel dizzy or have any discomfort, keep the back of your neck elongated and your gaze toward the tip of your nose. Soften the muscles of the throat.
To come out, walk one hand at a time to the back of the pelvis for support, draw the front of hips toward the knees and use your core muscles to lift your chest, leading with your sternum and lifting your head last.
Option 2: Camel Pose with a block between your thighs
Squeezing a block between your thighs can help you resist the urger to grip the glutes, which in turn allows you to find more space in the low back. It also reminds you to engage your inner thighs and hamstrings and helps you keep your pelvis in proper alignment.
How to: Bring your knees hip-distance apart with your shins parallel to one another. Stand on your knees with your thighs perpendicular to the mat. Place a block between the inner upper thighs, as close to the pubis as is comfortable. Squeeze the block inward slightly and up toward the pubis, encouraging a neutral pelvis and creating more space in the low back. Your palms can face you or away from you. Use your hands to press your tailbone down toward the backs of your knees as you lift your sternum toward the ceiling. Slowly lift your gaze and draw your shoulder blades toward the back of your ribs.
Reach your fingertips toward your heels without letting your hips shift behind your knees. You can tuck toes so that heels are a little higher off the mat and easier to reach. Try to reach your hips toward the wall in front of you. If you notice your buttocks tighten and clench, soften them a little by trying to roll your inner thighs inward toward one another. If it’s comfortable for you, you can lower your head back. If it becomes difficult to breathe or you feel dizzy or have any discomfort, keep the back of your neck elongated and your gaze toward the tip of your nose. Soften the muscles of the throat.
To come out, walk one hand at a time to the back of the pelvis for support, draw the front of hips toward the knees and use your core muscles to lift your chest, leading with your sternum and lifting your head last.
Pose benefits:
- Stretches the abdomen, chest, and lunges
- Strengthens the arms, wrists, legs, and spine
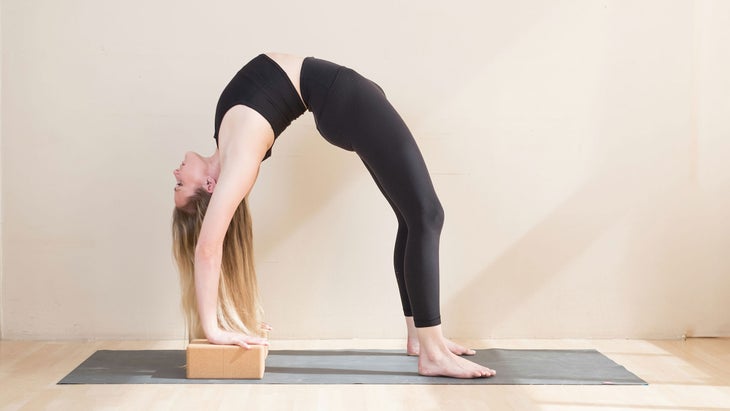
Option 1: Wheel or Upward Bow Pose with blocks beneath your hands
Placing your hands on blocks, rather than the mat, creates more space in your upper back so you can more easily straighten your arms
How to: Start by lying on your back with your head between two blocks that are just above your shoulders. The blocks should be on the lowest level and situated lengthwise on the mat. Bend your knees and plant your feet on the mat, hip-distance apart. Try to get your heels as close to your buttocks as possible. Bend your elbows overhead and bring your hands on top of the blocks with your fingers pointing toward your shoulders. Drive your heels down into the mat and start to lift your hips as if you were trying to bring your tailbone toward your pubic bone. Try to keep your knees and feet parallel and press through the inner arches of your feet.
Gently bring the crown of your head to the mat but without placing any weight on your head or neck. Check in with your elbows. If they are splaying out toward the side of the room, wrap them back in so that the elbows point straight up toward the sky. Start to press more actively through the hands, straightening through the elbows and lifting the head off the mat. Shift shoulders in the direction of the hands, but don’t pass the wrists. If you feel the low back is crunching, try lifting your heels to create more space. Roll inner thighs down and soften through buttocks.
Hold and breathe for five deep breaths. To come out, gaze up toward the sky and slowly lower yourself down, first the back of head, then lower your torso and, finally, your hips.
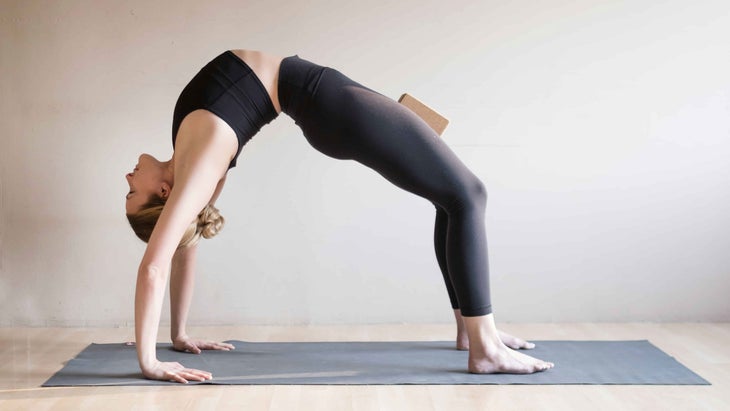
Option 2: Wheel or Upward Bow Pose with a block between your thighs
The shape of Wheel isn’t at all intuitive and can take a considerable amount of practice to coordinate the various engagement taking place throughout your body. Taking a block between your thighs helps reduces strain in your lower back by teaching you to engage through the inner and outer thighs and relax through the buttocks.
How to: Start lying on your back with your feet parallel and knees toward the sky. Place a block on its narrowest level between your inner thighs. Walk your heels as close to your buttocks as is comfortable. Bend your elbows overhead and bring your hands to the mat alongside your head with your fingers pointing toward your shoulders. Drive your heels down into the mat and start to lift your hips as if you were trying to bring your tailbone toward your pubic bone. Squeeze the block between your thighs and roll your inner thighs toward one another, as if you’re trying to move the block down toward the mat slightly. Try to keep your knees and feet parallel and press through the inner arches of your feet.
Gently bring the crown of your head to the mat but without placing any weight on your head or neck. Check in with your elbows. If they are splaying out toward the side of the room, wrap them back in so that the elbows point straight up toward the sky. Start to press more actively through the hands, straightening through the elbows and lifting the head off the mat. Shift shoulders in the direction of the hands, but don’t pass the wrists. If you feel the low back is crunching, try lifting your heels to create more space. Roll inner thighs down and soften through buttocks.
Hold and breathe for five deep breaths. To come out, gaze up toward the sky and slowly lower yourself down, first the back of head, then lower your torso and, finally, your hips.
See also: A Safe, Core-Supported Backbending Sequence
Pose benefits:
- Stretches the throat, chest, and abdomen
- Strengthens the upper back
- Stretches and strengthens the psoas
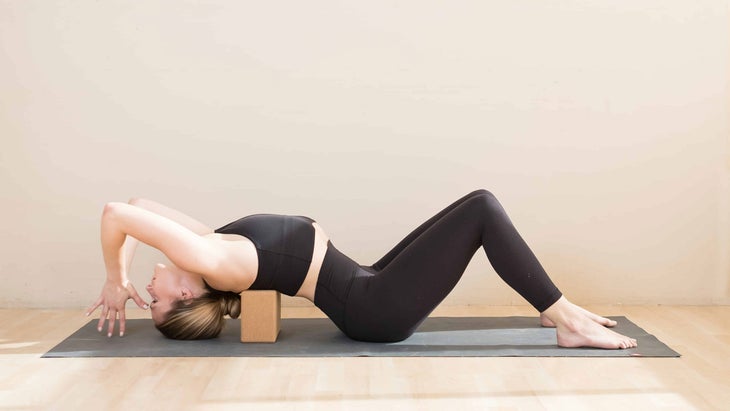
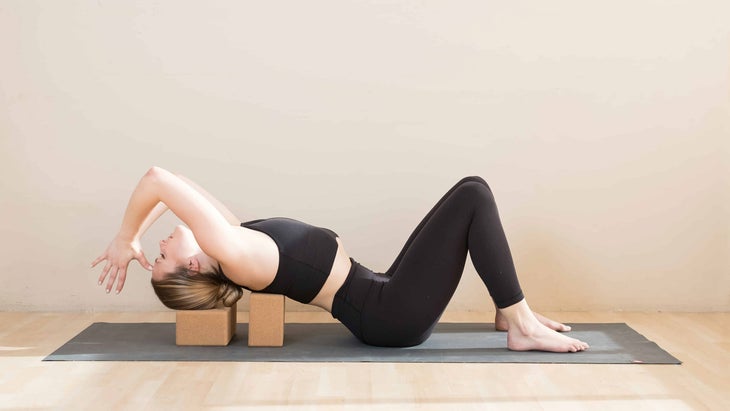
Option 1: Fish Pose with a block beneath your shoulders
Sliding a block beneath your shoulders offers support so you can find deeper relaxation, which in turn allows for a deeper stretch. The support of the block helps to create more extension in the thoracic spine and stretches the pectoral muscles, creating more space for deeper breathing.
How to: Start by sitting with your knees bent and the soles of your feet on the mat in front of you. Place a block behind you on the medium level with the long side parallel to the short side of the mat. Walk your hands and forearms back until your shoulder blades resting on the block; adjust the block as needed to ensure it is in the most comfortable position. If you feel too much pressure, shift your hips forward a little. Relax the crown of your head back toward the mat to open through the chest, rib cage, and throat. If it’s comfortable for you, extend your legs straight for a deeper stretch through the torso and hip flexors. Your arms can rest comfortably at your sides or in your favorite arm variation. (Pictured is arms overhead, elbows bent, hands in prayer to extend the stretch down your shoulders and sides of your body. Take deep breaths into your entire upper body, softening through the muscles with every exhale.
Option 2: Fish Pose with blocks beneath your shoulders and head
Resting your head on a block lessens the intensity of the neck extension, reducing any strain from the single-block variation above. It also offers more opening in the throat to breathe more comfortably.
How to: Set up just like the above variation of Fish Pose, but instead place a second block on its lowest (or same height), an inch or two behind the block that goes under the shoulders. Come in the same way as before, but this time, release the back of the head on to the second block. Relax the head back on the block, slightly tilting the chin up and away from the chest, opening through the chest, rib cage, and throat. If it’s comfortable for you, extend the legs out long for a deeper stretch through the torso and hip flexors. Your arms can rest comfortably by the sides or in your favorite arm variation; depicted is arms overhead, extending the stretch down my shoulder and side bodies.
Take deep breaths into the entire upper body, softening through the muscles with every exhale.
See also: How to Exit Backbends With Grace
Kapotasana (King Pigeon Pose)
Pose benefits:
- Strengthens your back muscles
- Stretches the throat, chest, backs of arms, abdomen, and psoas
Option 1: King Pigeon with blocks beneath your hands
Using blocks effectively lifts the mat closer to you, meaning you can make the shape of the pose without taking as intense a backbend.
How to: Start by standing on your knees, like you are setting up for Camel Pose. Place a block behind each foot. For the lowest height, place the blocks a few inches from feet; for medium height, scoot them back 6 inches or so; and for tallest height, scoot them back around a foot behind you. You can have blocks against a wall if you prefer more stability.
Bring your hands in prayer to heart center and reach overhead, following them with your gaze. Wrap your armpits in toward one another and your shoulders down the backs of the ribs. Start to reach up and back, keeping hips as close to over the knees as possible. Press the tops of the shins into mat, reach your tailbone down toward the back of the knees and lead with the sternum up as you reach your hands toward the tops of the blocks.
Hold for about 5 breaths, and gently come out by drawing your low front ribs down toward the hip points. The crown of your head is the last to come out of the stretch.
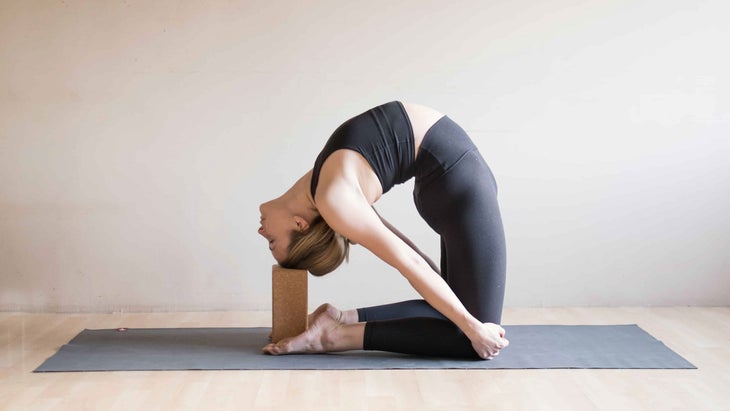
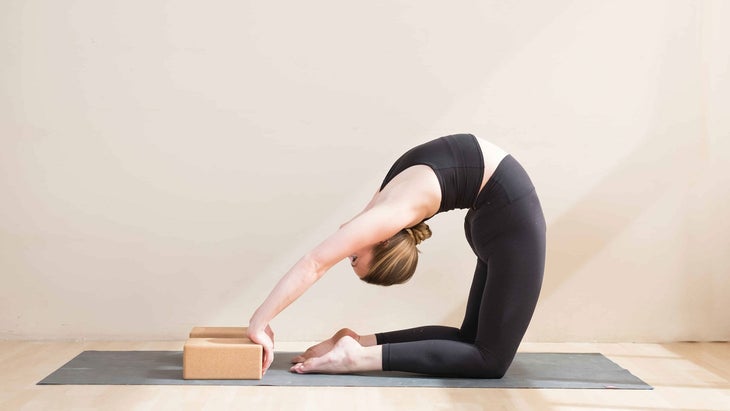
Option 2: Block beneath your head with hands on knees
Taking a block beneath your head supports the weight of your head and neck.
How to: Start by standing on your knees, like you are setting up for Camel Pose. Place a block on its tallest height between your two big toes. Bring hands in Prayer to heart center and reach them overhead, following them with your gaze. Wrap your armpits in toward one another and your shoulders down the backs of the ribs. Start to reach up and back, keeping the hips as close to over the knees as possible. Press the tops of your shins into the mat, reach the tailbone down toward the back of the knees, and lead with the sternum up as you descend the crown of your head on to the top of the block. Reach your hands around the fronts of the thighs, just above the knee, to create more expansion across the chest muscles.
Hold for about five breaths, and gently come out by drawing your low front ribs down toward the hip points. The crown of head is the last to come out of the stretch.
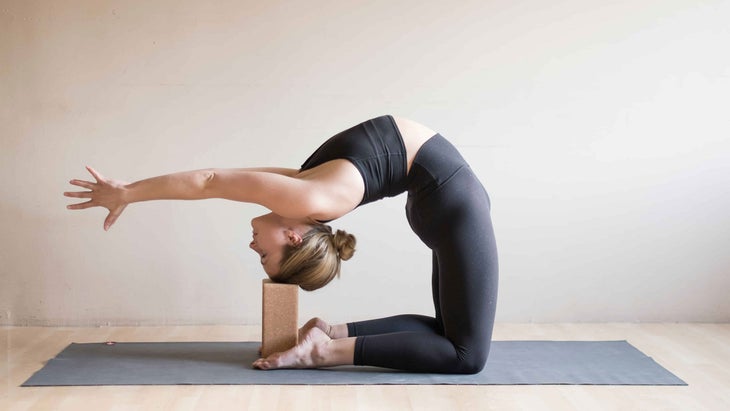
Option 3: Block beneath your head with arms extended
How to: Start by standing on your knees, like you are setting up for Camel Pose. Place a block on its highest height between your two big toes. Bring your hands in Prayer to heart center and reach them overhead, following them with your gaze. Wrap armpits in toward one another and shoulders down the backs of the ribs. Start to reach up and back, keeping the hips as close to over the knees as possible. Press the tops of your shins into the mat, reach the tailbone down toward the back of the knees, and lead with the sternum up as you descend the crown of your head on to the top of the block.
Continue to reach your arms straight back, finding a deep stretch across the side bodies, and breathe into the ribs. If it’s available and comfortable to you, you can reach your hands for the backs of the heels, keeping the elbows drawn in parallel to the distance between the hands.
Hold for about five breaths, and gently come out by drawing your low front ribs down toward the hip points. The crown of head is the last to come out of the stretch.
Block Benefit:
- Block brings the height of the floor up
- Block allows support for the head and neck while exploring different arm variations that prepare us for hands on the mat or grabbing the heels, forearms on the mat
This article has been updated. Originally published June 26, 2021.
See also:
Backbends Changed My Life, And They Can Change Yours Too
Advanced Backbends Are Within Reach
12 Poses to Transform Your Backbends
About the Author
Jenny Clise has been teaching yoga since 2012. Her classes are inspired by many schools of yoga, and her favorite style of yoga to teach is alignment based flows. She is an avid traveler, leading retreats around the world, and author of the yoga e-book BLOCKASANAS. To learn more about Jenny, her classes, or upcoming events, check out her website JennyClise.com or Instagram @jennyclise_.