“], “filter”: { “nextExceptions”: “img, blockquote, div”, “nextContainsExceptions”: “img, blockquote, a.btn, a.o-button”} }”>
When I first started practicing yoga, I quickly got discouraged. I often felt lost in class. Certain poses didn’t feel right in my body, and I assumed that there was something wrong with me. After months of going to studios and always feeling like there was no place for me, I stopped practicing altogether.
It took me years to realize that it wasn’t the size of my body that was holding me back. Instead, it was the lack of inclusivity in most yoga classes. We hear it all the time: yoga is for every body, no matter your size. But, despite this feel-good claim, there’s still little representation of bigger-bodied practitioners in the studio, and pose variations are rarely offered during classes. No wonder it’s easy for newbies in bigger bodies to feel like they don’t belong.
See also How to Advocate for Your Plus-Size Body in Yoga
It wasn’t until I started to uproot my belief that I was “too big” to do yoga that my practice started to change. I wasn’t “too big to practice.” I simply needed to stop forcing my body into shapes that didn’t support it. So I began to shift away from focusing only on the aesthetics of the poses and began to develop a more functional practice that worked for me.
An approach to yoga that works for everyone
An aesthetic yoga practice focuses solely on the appearance of the poses, which often means forcing your body into a shape it anatomically can’t do or isn’t ready to do. A functional yoga practice works with your unique body structure to identify the target area of the pose in a way that supports your body and doesn’t harm it.
Those of us living in larger bodies may not be able to get into some shapes initially, but there are many other options we can practice to help us get there. I recommend experimenting with different variations and utilizing different props to support your body in order to find a version of the posture that feels best for you.
10 ways to practice common yoga poses if you live in a larger body
Do what you need to adjust the practice to fit your body. Here are some variations for common yoga poses that help me. As you try these and other approaches, you will find more freedom in the poses.
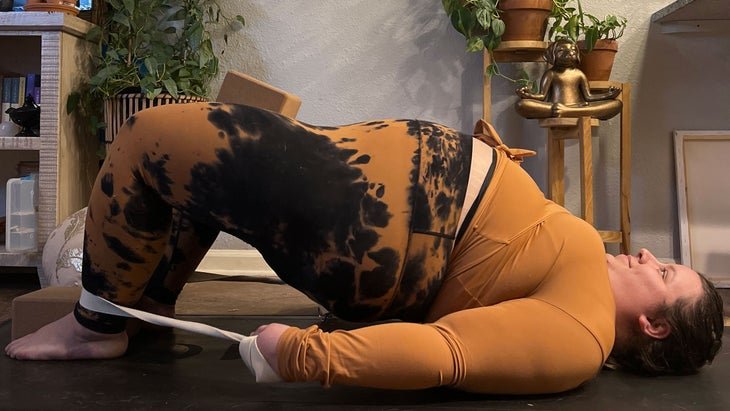
Setu Bandha Sarvangasana (Bridge Pose)
Start lying on your back with your knees bent and your feet on the mat about hip-distance apart. Grab 2 blocks and a strap. Bring 1 block between your feet and drape the strap across the front of your ankles. Place the other block in between your thighs. Adjust yourself here so your hips reach toward your heels. Squeeze both blocks to keep your legs and glutes engaged. Take an end of the strap in each hand and press your feet and the back of your arms into the mat as you lift your hips. Using the leverage of the strap, begin to crawl your shoulder blades toward one other. Keep squeezing your glutes and thighs into the blocks and pressing down through the feet. Breathe deeply. Slowly lower down and release the blocks and strap.
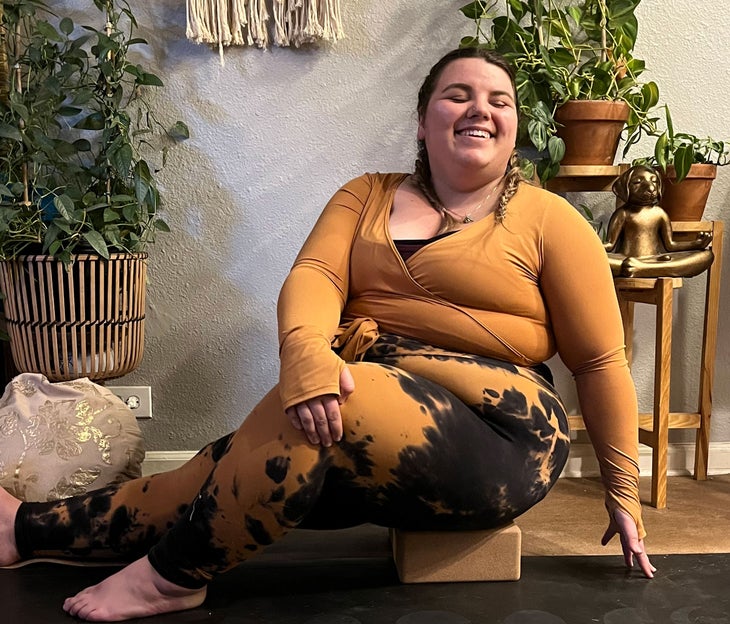
Ardha Matsyendrasana (Seated Half Lord of the Fishes Pose)
Come to a seated position on a blanket, bolster, or block to elevate your hips. Extend your right leg straight in front of you and bend your left knee, placing your left foot on the floor as close as possible to your right knee or thigh. Inhale and lengthen your spine, exhale and twist to your left, bringing your left hand behind your left hip and your right hand to the outside of your left knee. Breathe deeply. Be mindful to keep your spine straight and your heart open. Exhale as you release. Repeat on the other side.
Tip: Gently move your belly to the opposite side of the twist or widen your stance to ease compression.
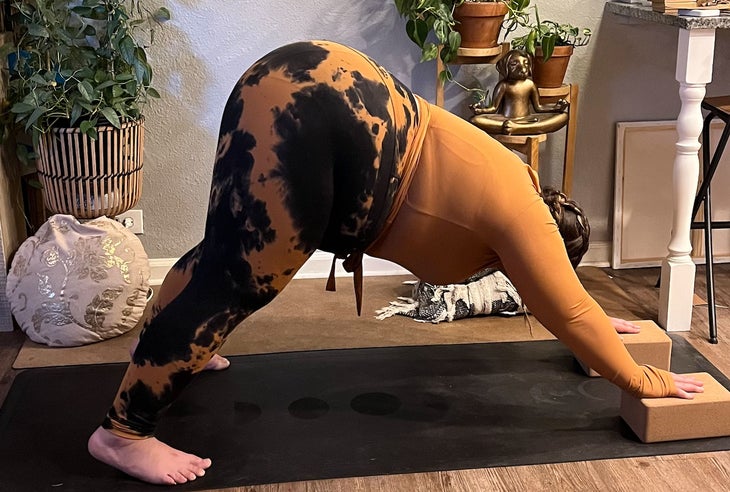
Adho Mukha Svanasana (Downward-Facing Dog)
Come to your hands and knees. Place your hands, shoulder-distance apart or slightly wider, on an elevated surface such as yoga blocks or the seat of a chair. Tuck your toes and raise your hips toward the sky, pressing your feet into the mat. You can keep your knees bent to any extent you need. Your heels may not touch the ground and that is okay. Spread your fingers wide and bring your weight into the thumb and pointer fingers if possible. Breathe deeply.
Tip: Downward-Facing Dog is a foundational pose that you’ll encounter repeatedly in most classes. Placing yours hands on an elevated surface can reduce stress on the wrists.
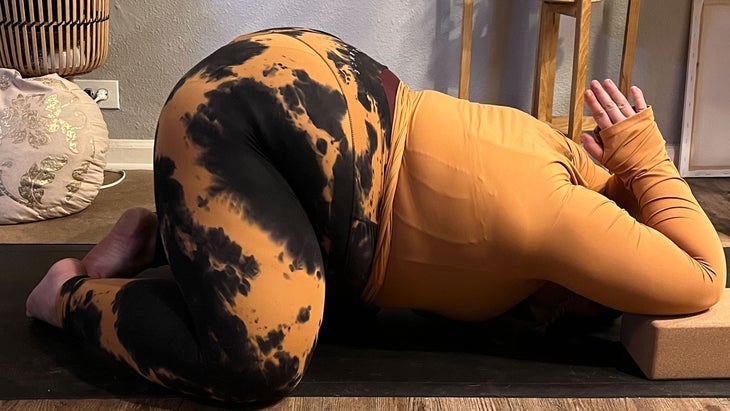
Balasana (Child’s Pose)
From Downward-Facing Dog with blocks beneath your hands, lower your knees to the mat. Bring your hips toward the mat as much as feels comfortable. Place your elbows on the blocks and bring your hands to prayer behind your head. Allow your chest to sink towards the floor. Hold here, breathing deeply throughout. This will be similar to Uttana Shishoshana (Extended Puppy Pose).
Tip: Keep your knees out wide to allow room to honor your belly. You can place a blanket on the mat to pad your knees.
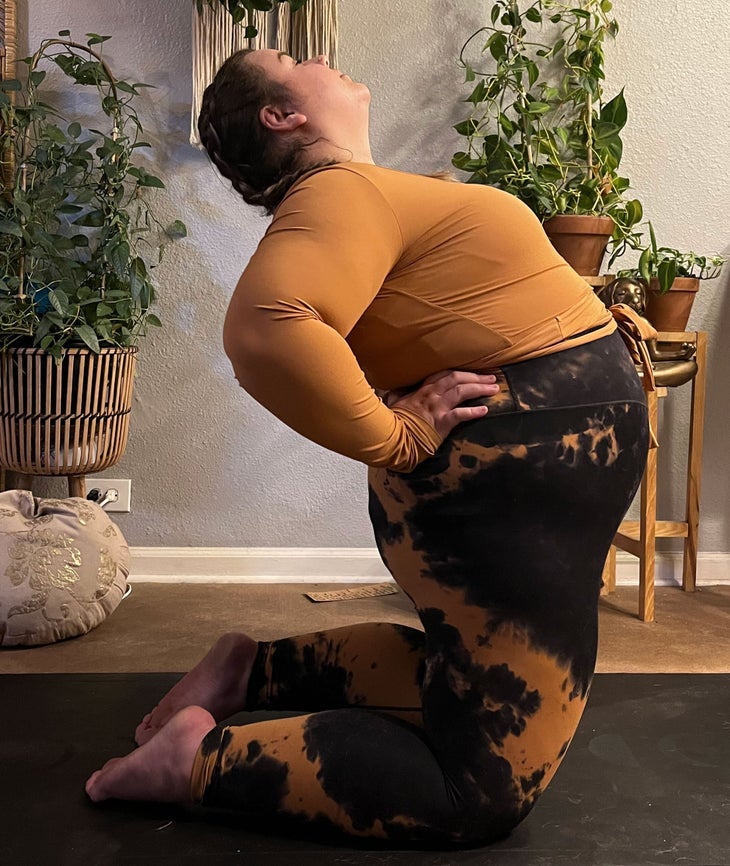
Ustrasana (Camel Pose)
Come to your knees, standing tall through the top of your head. Draw the hip points up and release the sacrum down. Engage your core to protect your lower back. Bring your hands to your low back with your fingers facing downward and your elbows pointing back. Inhale and gently arch your back into a backbend, keeping your chest raised, your core engaged, and your spine long. You can tilt your head slightly back if it feels comfortable. Stay here for 30-60 seconds and breathe deeply.
To safely come out of the pose, bring your chin toward your chest, engage your lower belly, and use your hands to support your lower back as you come slowly back up to kneeling.
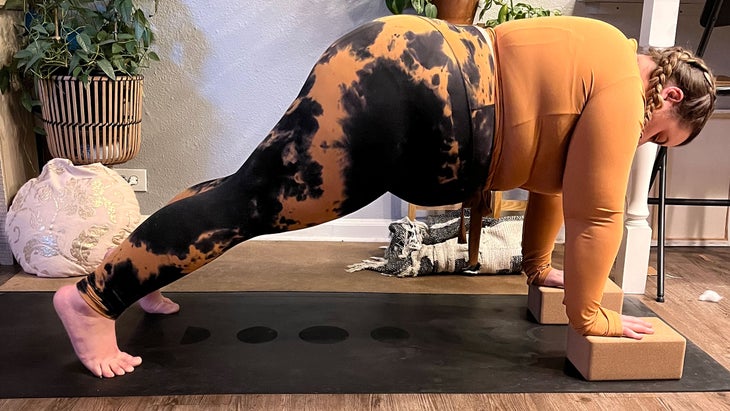
Plank Pose
Place your hands shoulder width apart on blocks. Step back into a Plank position, which is like the top of a push-up. Keep your arms straight and your shoulders over your elbows and wrists. Push your palms strongly away from the mat. Bring your gaze slightly forward to prevent neck compression. Engage your abdominal muscles by drawing your belly in toward the spine. Keep your hips in line with your upper body rather than letting them sink. Breathe deeply.
Tip: Placing your hands on an elevated surface can relieve pressure on your wrists, similar Downward-Facing Dog. Additionally, when your body is at an incline, it reduces the amount of weight your core needs to support and reduces strain on your lower back.
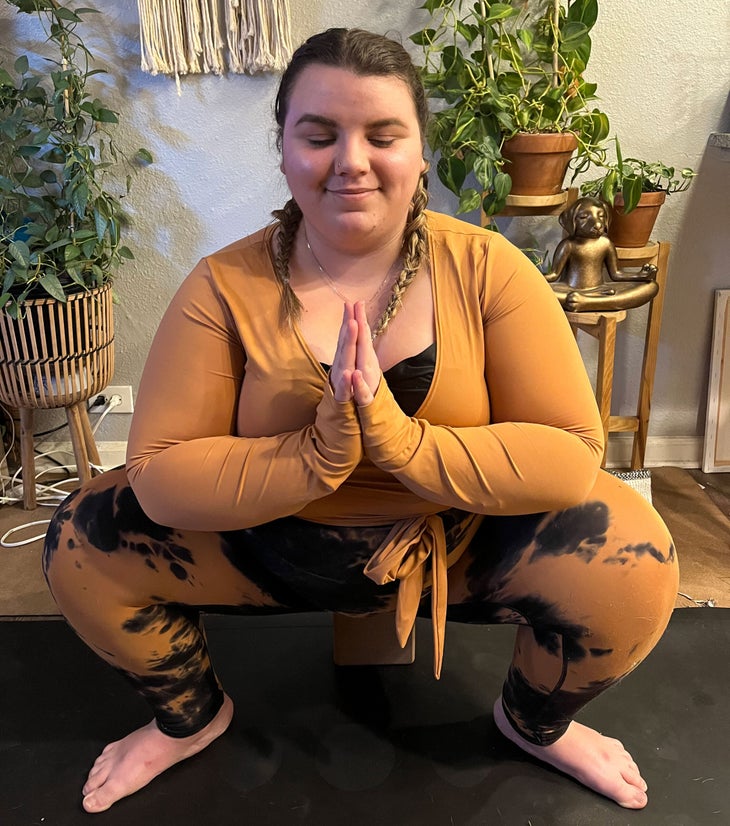
Malasana (Garland Pose)
Come to standing. Bring your feet about hip-distance apart and angle your toes slightly out. Bend your knees and begin to lower yourself down, bringing the pelvis down towards the mat and sitting on a block turned to any level to help with stability. Make sure to keep your spine straight and your heart open. You can bring your hands to prayer at your chest if that’s comfortable. Breathe deeply.
Tip: If your heels don’t touch the mat, roll a blanket or towel and place it in the crease behind your knees to help create balance in the pelvis and spine.
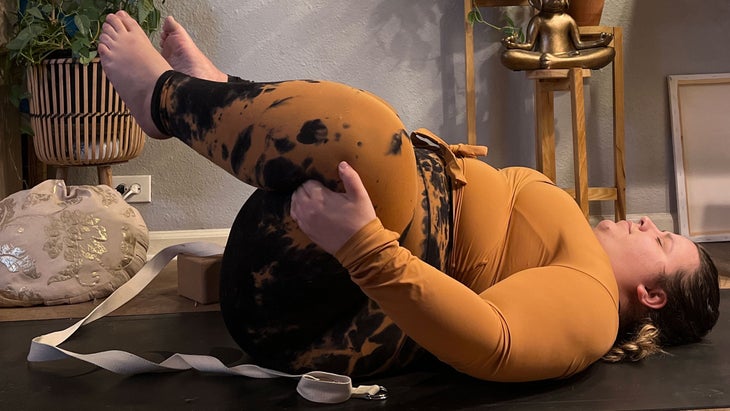
Knees-to-Chest Pose
Lie down on your back. Begin to bring your knees in toward your chest, keeping your knees wide to allow room for the belly. Place your hands on or behind your knees, whichever option allows you to keep your shoulders relaxed and resting on the mat.
Tip: Crossing one ankle on top of the other or placing a strap across the shins and holding it with both hands can help you create stability in the pose and make it easier to remain in the posture without creating unnecessary tension or strain.
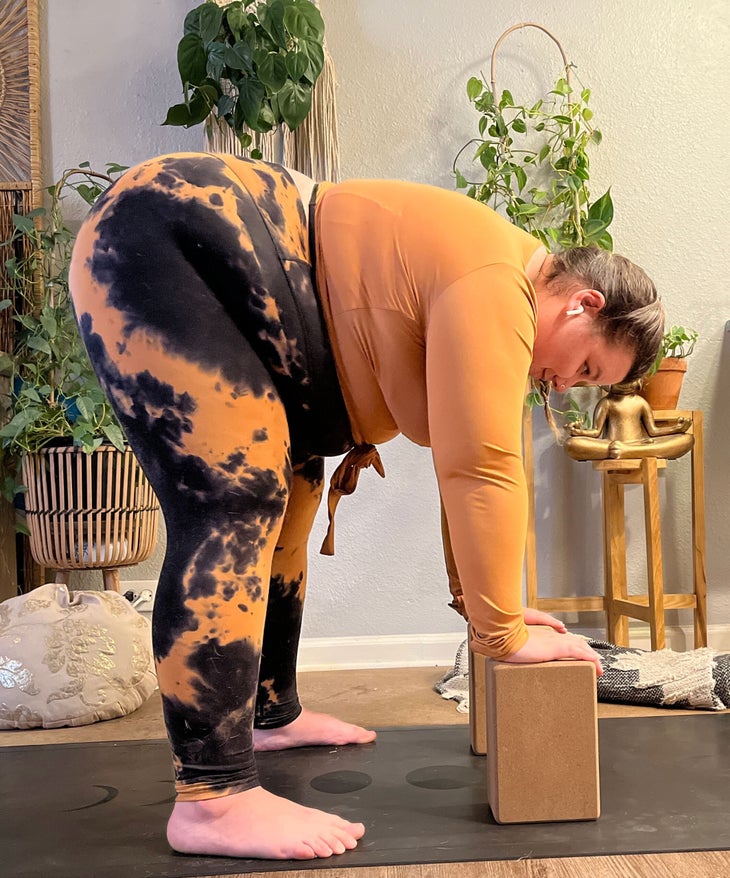
Uttanasana (Standing Forward Bend)
Place 2 blocks on the mat, shoulder-distance apart. Stand behind the blocks with your feet hip-distance apart to make room for your belly. Bring your hands to your waist, with your elbows pointing back, and begin to fold forward at your hips. Sink your hips back and bring your hands to the blocks, adjusting them to whatever height is comfortable. Take a few moments here to breathe and deepen into the fold.
To come out of the pose, when you’re ready, press into the blocks and start to lift yourself. bring your hands to your waist, squeezing your elbows toward one another, and slowly come all the way back to standing.
Tip: If you are feeling crunched, bring your feet wider, even wider than the mat, if necessary. Be careful to keep your toes pointing forward.
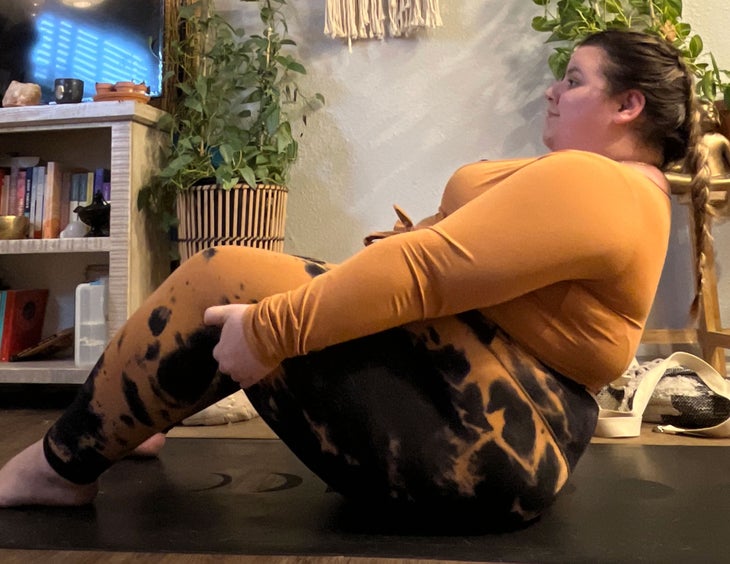
Navasana (Boat Pose)
Start in a seated position on the floor and move some of your flesh to ensure your sit bones are connected to the mat. Bend your knees and place your feet flat on the mat, Place your hands behind your knees. Begin to sit straight and lengthen the spine, lifting your chest. Start to lean back as little, engaging your core. Adjust your feet wider if necessary to allow room to honor your belly. Breathe deeply. Once you feel you have found your version of this pose, begin lifting one foot at a time. Work towards lifting both feet off the ground at the same time and find your balance.
Tip: Place a block between your thighs or calves to further engage your legs. You can also practice this pose while sitting on a chair. Place blocks under your feet and practice lifting one foot at a time. This will help you build the necessary core strength needed for the full expression of the pose.
About our contributor
Lua Briceno is a writer, artist, and trauma-sensitive certified yoga teacher specializing in hatha and Yin yoga. She is passionate about helping students develop a functional yoga practice that is nourishing for all bodies and backgrounds. You can find her on instagram @modern.moon.child or at www.modernmoonchild.com.

